..from Quena Flute making guide
Often this is the last stage of flute making... is optional but it'll definitely make your flute more authentic looking.. A good binding technique can help prevent bamboo flute from splitting. You can also use this technique to repair your cracked bamboo flute.
Follow through my steps and do it slowly. You should be able to get a good and tight bind.
The yellow arrow shows the winding direction of my thread
The red arrow shows the direction at which you should wind towards (towards the looped end)
How to Tie / Bind your Flute Professionally
Often this is the last stage of flute making... is optional but it'll definitely make your flute more authentic looking.. A good binding technique can help prevent bamboo flute from splitting. You can also use this technique to repair your cracked bamboo flute.
Follow through my steps and do it slowly. You should be able to get a good and tight bind.
Binding Steps:
Step 1: Make a loop like this
(btw this is the back of flute and its thumb hole)Step 2: Hold the loop with your thumb
Step 3: Start the winding.
Make sure each winding is tight and not overlapping each other.The yellow arrow shows the winding direction of my thread
The red arrow shows the direction at which you should wind towards (towards the looped end)
Step 4: Tying the ends
First, Yellow arrow..push the winding end of the thread through the loop
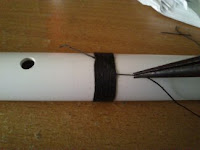
Second, Red arrow.. pull the thread at the other end as tight as you can, this will close the loop and secure the winding end.
I am using a pliers to tighten the bind.
Step 5: Trim away the excess ends with a penknife/Xacto knife..
You are done with the binding process!
For additional strength and finish, you may want to apply lacquer on the binds itself.
Do not over do it. You only want the thread to soak up the lacquer.


